Pages

Sunday, November 11, 2012

The Blue project

I  would like to start todays post just saying thank you to all of our military personnel and their family members. What you do for our country  is priceless and appreciated.    And now onto this weeks project.  As you can see my previous blog entry was the first half of this project.  This page was really inspired by som Mon Ami roses.

As you can see the rich navy blue color is just gorgous and thought it would be a great way to challenge myself and come up with a layout using a blue color scheme. 
 
The other piece I used from Mon Ami was this beautiful lace that I bought at last years scrapbook expo.  This lace was just so intriquete and beautiful I knew this would be perfect for this layout.  I highlighted by adding a flat backed pearl to the center of each flower on the lace.
 
 
The paperline I used is from Fabscraps another of my most favorite things


I also had this beautiful feather that I thought would play into the earthiness that I wanted to bring out in this piece.
 
It also allows me to tie this other embelleshment into the layout.
 
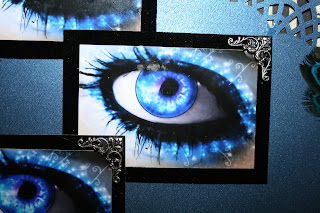
finally I needed a picture that would be dramatic enough for this layout........and I think this photo I found on Pinterest is perfect.
 
Here is the finished piece.  Thank you for stopping by and taking a look.
 
God Bless,
Jennifer
 
I was in a very creative mood this week and created not 1 but layouts inspired by Pinterest.  Now for all who are not familiar, Pinterest is this crazy, addicting and fabulous website, where you can put all your favorite things in one spot.  I have often thought to myself I could create the creates layouts with some of these picures and sayings that I have collected.  Here it is I hope you enjoy.
 
For all that know and love me you are familiar with my love of pink pretty things. So of course I based the first page on PINK!  I added  alot of little favorites such as pieces from Primas new Romance Novel line.
 
 
                                                                Lace and butterflies............

 
And of course, lots and lots of beautiful flowers.
 
and flowers...............and
 
yes you guessed it................more flowers.  most handmade by me  but I also used some I am roses, Mon ami and of course Prima creations because they are so beautiful
 
 
Well my fearless followers, since this posting seems to be running long (because I have so much to share on it)   I have decided to post the details of the ""blue" layout in morning......So I hope you stay tuned and enjoy...............


God bless and good wishes, thanks for stopping by.

Jennifer

Saturday, September 8, 2012

Mein Kindern,

Hello everyone, guess who! Yes, I am officially back from the world of broken arms and creating up a storm.  I really wanted to do something special after my longgggggggggg absense (thank you all for staying tuned)  So here is a layout and details of the canvas collage that I did with my favorite pictures of my children.  Enjoy.
 The first thing I needed to do after finding the perfect photos for this projects was to balance our the hard and soft backgrounds to represent both a boy and a girl.  For my son, I layered chipboard pieces that I made using 3/4" wide strips from my leftover box and cut them roughly into 1 1/4 in pieces (the rougher the edges the better the brick workl.  I glued them down over the picture and then used artist paste as my mortar.  After that dried I took a mixture of Starfish glimmer mist  with Fired brick distress ink and painted it on using a small brust.  The effect was exactly what I was going for.
For my daughter I used some lace to soften her side of the collage layout.  For my primary inspiration I used Prima's new line Romance Novel.  This collection was created by a wonderful artist Marion Smith. 

 To stay with the theme of Romance I used a technique that I created to make a rose vine running up the middle of the layout.  I used a few diffterent rosebuds to make it more interesting.
 To really highlight this I laid out a foundation of diffterent flowers from Iamroses and Prima.
And of course one of my own.
 
And of course I had to use some Tim Holtz

The collection has some beautiful chipboard elements that worked perfectly for this layout.
 
 
I think the final result is exactly what I wanted and can't wait to display it.

As always thank you for stopping by and taking a look. 

Thursday, August 2, 2012

Happy Thursday!

Good Morning all,

I wanted to do a quickpost for all of my faithful followers to let you know the reason for my lack of a recent post.  A few weeks ago I unfortunately broke my left arm which has resulted in a cast from my fingertips to my shoulder.  I have been unable to get into my studio and create anything so please be patient and bear with me though this time because once this thing cones off I have alot of pent up creativity to release so watch for alot of great things to come.

Thank you,
Jenn

Sunday, July 8, 2012

Live, laugh, Love


Hello Faithful followers, it has certainly been awhile since my last post so thank you for your patience.  I decided to branch out into a little different piece this time.  This a multi media layout I made on canvas.  I really had fun stepping out of my creative zone and learning a new technique or two. 


I started with a , forgive the pun, blank canvas.  I added the picture I wished to focus on, added some dimension by adding the brickwork (made by cutting chipboard 1/2 by an inch or so. After allowing the glue to set up I added a paint treatment that gave a very stucco like feel to the piece.  This also served to blend the picture and brickwork onto the canvas.  after adding a layer of white acrylic paint coat over that I just started adding everything and anything that reminded me of my children.  As you can for my daughter I added a crown (which was actually a broach I had and I just added the blue jewel for color)  Because every princess needs a crown.
The piece I used to represent my son is pair of wings from the Tim Holtz Ideaology collection set together with a blue flower from Mon Ami Gabie. I like this piece so much because it will hopefully remind him always that he is my angel.
and some gears also from Tim Holtz , since I have the die to cut these now I have really had alot of fun playing with different materials.  As you can see here I used cardboard

I had to add a butterfly and some feathers.


I finished it off with these cool metal corners that I found at Michaels, sorry I don't know the names right now but it is a really cool like of metal pieces that, as you can see, can be inked to match your project.

Thank you for stopping by, until my next post, I will bid you auf wiedersehn.

Jennifer

Wednesday, May 23, 2012

Congratulations Donald and Peta

A shout out to my boy Donald Driver for winning Dancing with Stars.  You were amazing and I'm sure it felt great to win.  My question is how bad are they going to tease you at training camp this year.  How do you top this, I know SUPERBOWL RING!


Monday, May 21, 2012

Lovely Lex!

Happy Monday everyone, I hope you all had as a beautiful weekend as I did.  The weather was gorgeous, I got alot accomplished and I finished another layout that I have been wanting to.  I am sure alot of you are like me and have that "bucket list" of projects that you want to do someday.  This is one of them.  My beautiful niece Lex had her junior prom and was kind enough to put her pictures out for us all to enjoy. 

My sister, Laurie shared these lovely little butterflies with me from Vintaj and they fit perfectly over a chipboard butterfly (found in the dollar place at Michaels) that I coated with Tim Holtz crack paint. The effect is absolutely stunning.

I really didn't wait to put too much dimension on this because it's going to go into a project for my Mom, but I wouldn't be me if I didn't add some bling and bows.  I love exploring the sewing section in my local fabric stores to seek out and find new little ribbon roses.  These came in a cluster of 3 and the I love how they look.

 I did use one of my vine/flower clusters to balance out the right side and add a touch of pink to match her beautiful dress.

I added her name by making a tag using the Styled Labels die from Tim Holtz movers and shakers line, I cut 2 pieces out one in black velvet and one in pinktini card stock.  Offset them and add Lexie's name in pink rinestones.  In the corner I added a display trim corner in antique brass from 7 gypsies 
I must sign off for now my friends but I really hope you enjoyed my project and try some of the techniqes, I would love to hear your thoughts or just stop by and say hi. 

                                                          Thanks for stopping by
                                                                      Jennifer

Thursday, May 17, 2012

Today is my lucky day!


I just found out today that I was the winner in Donna Salazars Ginormous give-away.  Wow I am speechless (and for those that know me that is quite amazing)  For anyone who is not familiar with Donna and her very creative team you should pop on over  and check out her blog at http://donnasalazar.typepad.com/my_weblog/ very inspiring place to go!

Thank you,
Jennifer

Tuesday, May 15, 2012

ATC swap for Dusty Attic


Hello everyone, well spring has sprung in Wisconsin and my roses are just about to bloom.  Something new is around every corner, so in the spirit of that, I decided to do something new.  My first swap, oh I am so excited.  My friend Jenny Burns, a designer from http://dustyattic.ning.com/, has invited me to my first ATC swap.  For all of you new to that an ATC stands for Artistic Trading Card.  Dusty Attic is one of my favorite places to go for inspiration.  They have a lot of really talented artist designing for them and I would be lying if I told you I wasn't so excited to be a part of their May ATC swap. 
 The theme is vintage and I had so much fun, there is really no rules other than the cards must be 2.5 x 3.5 inches and that they must be traded never sold.
I played around with a lot of bling of course, but when I started making these I realized the Dusty Attic chippies were more than enough for them.
 I wanted to do a theme without making the same card 5 times so I took the main elements and used similiar graphics.

But used different elements and flowers.

Hey I had to dress them up a little with girly bits but I can honestly say I love these.  I didn't overdo it with alot of bling but I think their lovely.  I can't wait to get mine and maybe learn some new techniques.  Thanks for stopping by and taking a look.


                                                                  Jenn


Tuesday, May 1, 2012

new flower


Well today I did a little soul searching, I am in a severe dry spell right now and I am buying more than I am creating so I was perusing one of my favorite blogs http://astridsartisticefforts.blogspot.com/ and she gave me the inspiration to do some tags, thank you Astrid. I just threw together (really it was more like a couple of days of heavy duty creating) and I cam up with a few ideas.  

 I have these cool tags from Tim Holtz that I built off of.  Here's one (sorry it's upside down) but I can't wait to use it.

This one leads me to my next part of this blog entry, tada I made a new flower.  Now ladies I am not going to insult your intelligence, there are so many creative artist that make flowers, I just tried to Blingify one.  Hope you enjoy!

I started with my new favorite toy the Donna Salazar Rose Creation dies by Sizzix.  Oh I am telling you if you want to dabble in the flower realm you must get this die. Here are the materials I used to make this.
I took one cutout from all sized of the flower (6 in total), some blue perfect pearl mist, gold perfect pearls, some homemade flower vine, scissors, and tools to curl the flower petals I used a small pliars and a paintbrush.

 I sprayed both sides of some black velvet cardstock I had with perfect pearls and let them dry, I sprayed the backs because they will show.
 I then curled the petals, the largest I curled the petals under and the other 5 I curled toward the center.

I then just stacked them largest to smallest swirling the petals so that one full petal overlaps the gaps of the next petal. I secured them with a brad as shown. Now here's where the magic happens.
I then took all these extras, the little rose buds from www.monamigabi.com/, the leaves and the flower vine and I built off of it.  I started by gluing the flower vine in between 2 layers of flowers and I glued on some leaves and finished with a few of the beautiful blue rose buds that I found at Mon ami Gabi.  I then made a mixture of a bit of perfect pearls in gold and mixed it with water, it makes such a beautiful accent paint and I had fun "painting" my flowers gold I just added hints of the gold paint here and there but it really is so much fun and it makes me feel like a real artist I love it/.  Here is the finished project waiting to be put onto a page or a gift box or some thing. 

I thank you all for looking and inspiring me everyday.  I would love to see what you ladies do with this technique and if you email me a picture of your work at jenniferberkhahn@yahoo.com I will humbly share your works of art with my blog followers.  Thanks for stopping by and please leave a comment you ladies always put a smile on my face. 

Jennifer